Showing posts with label kitchen storage. Show all posts

Tuesday, May 28, 2024

Bread Box Upcycle

 Fyodor Dostoevsky once said "There is not a thing that is more positive than bread" It is an essential in most lunch boxes and kitchens but where do you store it?  A bread Box of course!

I love a bread box upcycle a satisfying quick project!


I think this is an Ikea Bread Box sturdy but made with cheap material and well, Plain.


After a Good sanding I painted with Dixie Bell Collard Greens sanding between coats.  
I love Iron Orchid Designs products especially there Stamp collections.  I choose their Type Setting two sheet letter set for the wording.  Sanded and distressed lightly then applied clear and dark wax and put the original pull back on it. 


A nice hiding spot for your bread!

Happy upcycling !
Sheryl


Wednesday, February 8, 2017

Industrial cabinet make over Awesome Kitchen Storage...organization

You do not find metal drawer cabinets that often and when you do they can be quiet pricey!  So when I found this one for under 20 bucks...even though it's drawers missing I snatched it up!  

The Plan:  Kitchen Storage


It was in nice somewhat clean shape.  I used a mixture of rubbing alcohol and a Mr. clean sponge to get the heavy marks off and to sanitize the drawers...

IT worked beautifully !

The pen and sharpie marks are gone...the normal wear I am not that worried about.
I elected not to paint it because, I like the industrial color and could not think of another color I would rather have.  


I now had to deal with the missing drawers.  I thought about baskets or custom made slide in wooden drawers then it hit me.  I have pets and am not as young as I used to be .."will I really use the lower drawers?"  So a kick plate it was.  I had some great aged scrap in the stash at the woman cave and asked Mr. RTI to help me measure and to cut it the size. I needed
To give the cabinet "balance" so I also added a piece of maple from my Dad's Shop for a top.


The next step was deciding what I was going to store in the cabinet. Spice?...utensils?..food?..ect?..ect?.

Since I have recently dedicated a drawer near my prep area to spices..


Mental note:  This was one of the smartest things I have done in my kitchen.  I saves steps time and makes putting spices back up so much more easy. I also added to this drawer a set of long handled measuring spoons that will reach in to every jar easily.


No not all jars are the same size or type however they all fit and I can see what I have at a glance.  BIG TIME SAVER!

Now back to the cabinet.
Spices are taken care of so I elected to use the cabinet for utensils that I use however not every day and various kitchen items that fall under the same category.
To make it all easy to find I added labels to the label holders on the drawer to indicate what was in it.  Yes this was tedious...and I kid you not I had to hang in there to finish.  I struggled with this part of the project however it was worth the effort.  Every thing can be found at a glace.
Here is the theory on the labels :
Not what the item is but what the item does.  Ex.  There is a drawer dedicated to "Grate"  If it grates it is in the drawer...One to , "Strain"  If it strains then it is in the drawer.   


The empty Drawers I put blank labels on and will use the Ptouch to add them as I find uses for the drawers.  


The top has a fruit bowl and basket for mail...and a great spot to rest a cool vintage pyrex refrigerator Dish..  I even added to a lower drawer  Lysol to hit that trash can with and wipes to wipe it down when needed.  Less steps and less time looking for what you need.  A WIN WIN!

You can read about my first craft room metal cabinet upcycle here

Hope you are inspired to organize an area in your kitchen or bath..or closet ..Just bite the bullet and do it.  You will not be sorry!

Wednesday, March 16, 2016

Pinterest inspired Sideboard Using chalk paint

I lucked up and found this great little sideboard with awesome Utensil drawer and great storage.  I also love the lines and curves on this simple little number.  


  This guy sat in my booth for about a month then I decided it was time to jazz it up a bit.  Normally painted furniture takes a while to move in my area and well....it had already sat a month....what did I have to loose.

I mixed several different colors to get this funky Turquoise color......
Here it is with coat one.....


I am not great with antiquing wax because I am lazy!  I have a limited amount of time to play work so I try make my make overs quick.  However I had a dream for this item.....


The Photos do not do this one justice....I am sorely disappointed that  this will not go in my home. 


There was a creative approach to the step back on the front...and it was to paint the inside or not to paint....ahhh...not...the inside is really in quiet good shape.  however the two center doors step back exposing the unpainted inside...to paint the area would look some what out of place on the inside so i just painted the front base cutting in on the natural line.  


And I actually love the juxtaposition between the natural wood and paint..... 


The dark wax was a challenge more buffing, more working it in and more fretting!  I did clear wax first then I mixed my clear and dark almost equal and applied liberally (with a wax brush) using  super fine steel wool to knock the dark color back a bit...and here is the secret some of you are going to gasp at....the waxes mixed where not the same brand..nor the paint.  The paints were a few colors of different brands of chalk paint and a little laytex was added for pigment.  The waxes were Annie Sloan dark and Min wax Natural...I like Minwax it buffs quickly with a nice hard coat and the shine is to die for.  When I mixed it with the dark AS I got the great quick finish of Minwax with the richness of AS dark.


I hope that this post finds you anticipating spring!
Sheryl


Sharing with.....

Saturday, April 25, 2015

Shabby little caddy Utensil silverware storage up cycle using chalk paint and the Silhouette Cameo


I am sure that I am not the only thrifter to pick an item up because it is only .50 cents.  This caddy is one of those finds.  It was in wonderful shape a little out dated and the perfect project to break out the Silhouette. 

   
Before just a plain ole wooden caddy.


I am a lazy crafter so I taped it off so that I would not have to deal with the interior.  Painted it with Jackson (black) by Southern Honey and the stencil was with Nanny White by Southern Honey.  

After a few coats of paint and stencil a buffing and distressing with sand paper.  I finished the caddy up with Johnsons Paste wax.  This is a great wax for signs and items like this.  I have used it on table tops but applied a few coats.  On the Caddy and signs that I make I simply use one coat.  


SOLD

Not to bad for a .50 cent investment.  Here's a hint...I have found that with most latex chalk base paints they are thick.  To make the brush marks melt away I spritz the surface with water then brush on paint.  It really makes a difference in the finish you get.  
Hope you have that .50 cent find just waiting for a transformation.
Sheryl


Sharing with:

Tuesday, December 9, 2014

Coffee Bar on a budget open shelving concept in Mobil home Kitchen


I did not edit or change anything when I took this photo this morning of an addition that Mr. RTI and I  made this summer.  This wall has been a modge podge of furniture and racks.  We decided that we wanted a dedicated area for coffee and tea as well as snacks and some much needed storage.

As you already know when you walk into the hardware or home improvement store prices are astronomical when it comes to cabinets.  Fortunately we are on a bit of a budget so we had to think out side of the "box" and I love the design we came up with.  

We started by building a pine base to fit the dimensions we needed....We did have to scribe the back of the shelves to fit a not so straight or flat wall....WARNING SMART PHONE PHOTO!


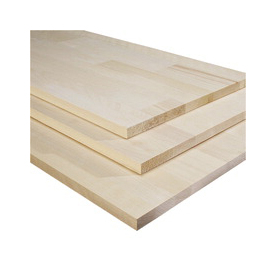
We also used the same pine as the back "splash" and added a kick board so that doggy bunnies cannot hide underneath.  The two shelves are higher grade plywood...and the top is from the shelving isle it is

Clear Kiln-Dried Aspen Panel 


 Clear Kiln-Dried Aspen Panel (Common: 3/4 x 24-in x 72-in; Actual: 0.75-in x 24-in x 72-in)

After a light sanding to smooth it out....I stained it with Cabot Cove aged leather stain with poly...I applied three coats letting it dry over night.  Then I applied paste wax to add another water prof. coat on top.  It looks and feels like reclaimed lumber with out the work or the high cost.

The bottom shelves were actually stained with White floor deck stain.  And are holding up nicely.  The trim I used standard house trim paint in white.  
ANOTHER SMART PHONE PIC!


The top shelves are actually melamine coated garage utility shelving.  It is durable already white and cleans up like a breeze.  I used the same shelving when I removed my upper cabinets above my stove... a few years back and I am very impressed with its durability.


This area is very busy all day.  There are up to five people here on a daily basis that drink coffee or tea more than once a day.  My kitchen is  Grand Central at our home, as you can see from the mess on the table, and this made a very economical and efficient addition..
Now to talk Mr RTI into doing the rest of the kitchen........I will try to keep you posted!
Much love all Season!
Sheryl


Thursday, June 5, 2014

This is for the birds... cabinet Upcycle using chalk paint and Bird Prints


I am very pleased with this little project.  I found this little cabinet at a yard sale and could not pass it up a great deal and real wood .  It was a well used item kids had colored on the inside and it had some water damage .  


I am sure it was intended to look like an old ice box.  

I broke out the Southern Honey  chalk paint and took care of the exterior

 I had a lone bird knob I picked up on the clearance rack at World Market.


And for the inside to avoid bleed through of markers and crayons and to avoid having add a sealer before painting (I am a LAZY crafter) ........


Modge Podge and a worn bird book with wonderful plates of art work in it, were my solution....
Drawers and Doors were also covered.....


I do like the out come except for the natural wood on the inside of the door....and it was painted an off white just did not grab another snap shot.  It was a much needed improvement!

A fun and quick project!  So the next time you walk up on a pretty little number with some kiddy art work on it think Modge Podge.......


Sheryl
SOLD Sharing at:

http://www.frommyfrontporchtoyours.com/

http://www.nancherrow.com/2014/06/welcome-fridays-unfolded-112.html

http://missmustardseed.com/2014/06/furniture-feature-friday-favorites-link-party-24/


http://chiconashoestringdecorating.blogspot.com/2014/06/flaunt-it-friday-209.html

http://www.redouxinteriors.com/2014/06/best-diy-linky-party-157

http://www.dwellings-theheartofyourhome.com/2014/06/amaze-me-monday-63-blog-linky-party.html
http://www.pinkwhen.com/diy-sunday-showcase-628-and-favs/
http://anextraordinaryday.net/craft-room-makeover-project-inspired-link-party-78/
http://theinspiredwren.blogspot.com/2014/08/inspire-us-thursday-august-7.html