We started this project with the intentions of seed starting and over-wintering plants. Now that we have gone through the process and have, an almost, finished project this just may be too pretty to put "Dirt" in.
When a good friend offered up free windows we of course said yes. We had always wanted to build a green house from old windows. Then that same friend offered up a chandelier of course we said yes and Thank you! Then another friend offered up an antique door and some more windows we were feeling very blessed. Then a friend offered a granite top table and another had given me some oil lamp iron wall brackets with bowls that were perfect! I look at this Green house and it is full of people that listened to my dream and gave graciously to see it come true. With that being said the true giver in this story is my Husband! All of the creative construction was his brain child. We have been together almost 30 years and he has paid attention. The house is beautiful !

The beginning of this project was measuring and counting windows. Pulling out that High school geometry class lessons also helped. The Green House measures 10 x 10 we could have made it bigger but the cost of the roof would have exceeded the budget for a roof. After we measured and planned the window placement, bracing, and foundation dimension , we were ready for construction to start. Make sure that you account for all of your bracing before calculating your foundation. We learned half way in to the foundation construction that we had not accounted for some bracing. Level is the key here, and our yard is not level, so we dug in bricks and blocks (these will be hidden by raised garden beds) to make a level plane. We used treated 10 foot 4x4's overlapped the corners and lag bolted them together. On the corners he also used 4x4's as post and cemented them into the ground.


Once your foundation is installed level and the correct size you can now put in your wall bracing to attach your windows. We used 2x4's and stacked our windows and attached them to the outside wall .
The last wall to go up was the front and we had to decide where the door was going to go as well as the window placement. We filled in beside the door with scrap 2x4's stacked like ship lap. The door was worse for wear and had to be sanded, repaired and painted.
At this point all of the windows are installed making the walls and the door has been planned for.
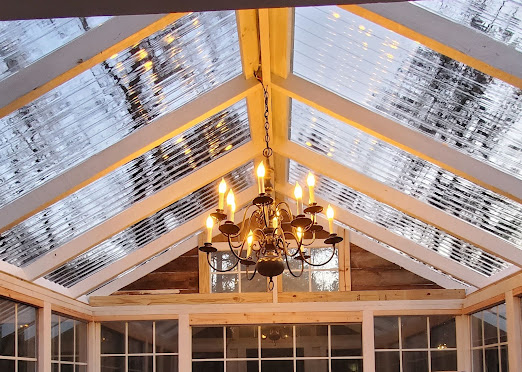
The next step is to put the rafters in for the roof. The pitch was based on the size of the chandelier. We wanted enough chain on it to make sure that is looked like a hanging light and we did not want to walk into it every time we walked in the green house. So the roof height was the length of the chandelier plus a few inches. Every board was measured and cut simply because the roof will be clear there is no where to hide a mishap. We also painted the rafters before the roof went on.
The over hang was determined by the length of the roofing panels. We did not want to cut them it was easier and looked cleaner to extend the overhang to accommodate the length of the roofing polycarbonate panels. The roof was not cheap. These panels are expensive. In the above photo you also can see the lower vent. It is a wall board that has hinges on it and we can lift allowing better air flow through the Greenhouse.
The roofing is up with the solid roof panel closure strips. This strip will help seal your roof and add support on the raised corrugated rows.
Mr. RTI decided to use some smaller windows above the door and over the back large window. One of the panels above the large window is hinged for ventilation. We also added a galvanized ridge vent.
Snow Break!
We filled in around the upper windows with fence board. Dave also put 12x12 inch patio pavers on the floor with a foot of gravel along the planting wall.
The weather was a challenge, for these parts, we are not use to snow but sure do love to look at it for a day or two.
I think the extra height was worth it. The chandelier makes a great statement!
After we recovered from the price of electrical wiring the chandelier was installed as well as the power with a few outlets.
The door was water damaged and we had to replace the bottom panels inside and out. I decided to break up the white in the inside by leaving the door natural with a coat of poly on it. I painted the panels grey.
When had to cut the door off and in doing so it weakened the joinery and the door sagged. We added some hinges and a metal strip to hold it together. Dr. Frankenstein would be impressed!
There is still trim that needs to go on it. Some caulk to make it a little more efficient and possibly some running water in the summer time. SSHHHH I have not shown Mr. RTI the gifted pedestal sink.
Flower beds are being planed as well as a veggie garden. Planters are still in winter storage waiting for their place around the greenhouse and Mr. RTI is working on a patio landing in front of the door. I will also share this and the potting bench idea later in the spring.
I hope this post finds you well God Bless!
Sheryl